VirtualBox 호스트 전용 어댑터 설정
나이가 들어가니 매번 vm 만들 때마다 얼마 되지 않는 이 내용을 검색해서 찾을려니 죽을맛이라 ㅎㅎ
그냥 찾기라도 편하게 블로그에 기록해본다.
VirtualBox에서 기본으로 vm을 설치하면 NAT 네트워크로 연결이 되서 그냥 ssh client로 접속하는데 꽤 불편하다.
호스트 전용 어탭터 설정을 통해 내부 고정 IP로 세팅하는 방법을 기술해본다.
Windows 기준이지만 mac도 거의 동일하다.
VirtualBox 환경설정에서 어댑터 추가
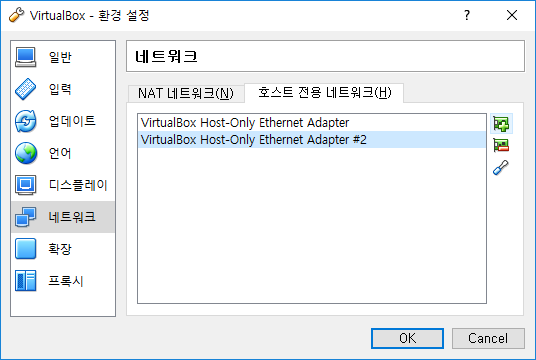
VirtualBox- 파일 - 환경설정 - 네트워크 - 호스트 전용 네트워크 메뉴에서
호스트 전용 어댑터를  버튼으로 신규 호스트 전용 어댑터를 생성한다.
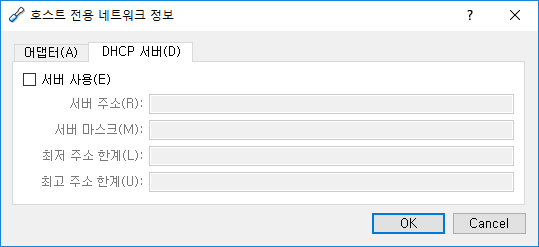
편집( )을 클릭하여 아래와 같이 IP 주소를 확인한다.
예제는 192.168.253.1 인 것을 볼 수 있다.

또 DHCP 기능은 사용하지 않으므로 체크되지 않는 것을 확인한다.
VM 설정에서 어댑터 추가
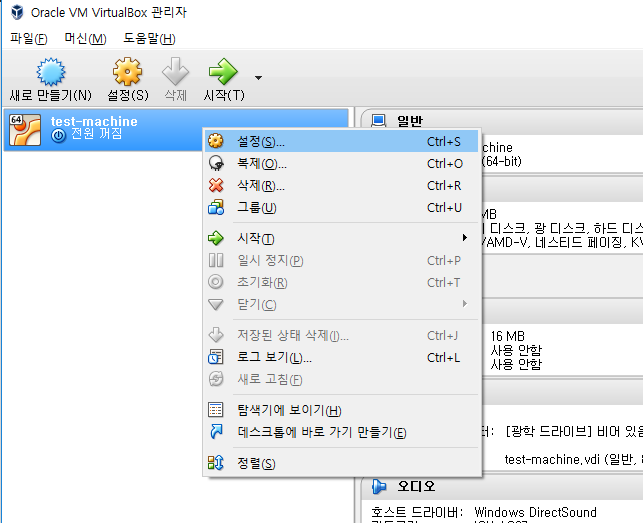
VM설정에서 환경설정에서 추가한 어댑터를 추가한다. VM이 종료된 상태에서 작업을 진행해야 한다.
어댑터2번에 신규로 추가한 #2번 의 호스트 전용 어댑터를 추가한다.
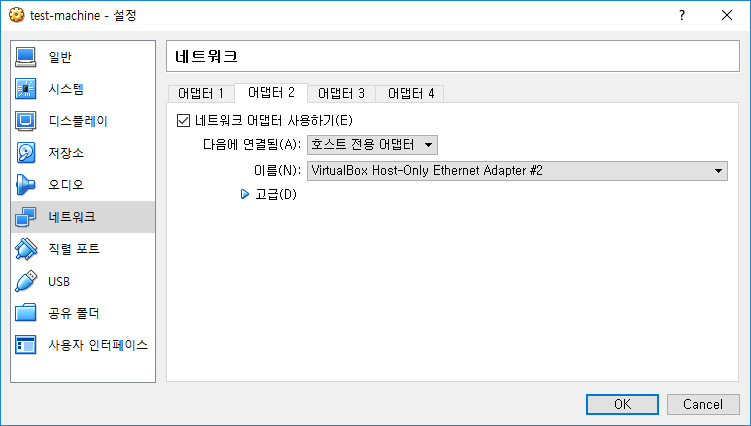
GUEST OS를 시작한다.
GUEST OS 네트워크 설정
ifconfig으로 현재 어댑터 정보를 확인해본다.
$ ifconfig -a
enp0s3    Link encap:Ethernet  HWaddr 08:00:27:ec:8e:1c
          inet addr:10.0.2.15  Bcast:10.0.2.255  Mask:255.255.255.0
          inet6 addr: fe80::a00:27ff:feec:8e1c/64 Scope:Link
          UP BROADCAST RUNNING MULTICAST  MTU:1500  Metric:1
          RX packets:6 errors:0 dropped:0 overruns:0 frame:0
          TX packets:56 errors:0 dropped:0 overruns:0 carrier:0
          collisions:0 txqueuelen:1000
          RX bytes:1596 (1.5 KB)  TX bytes:7105 (7.1 KB)

enp0s8    Link encap:Ethernet  HWaddr 08:00:27:86:ed:d1
          UP BROADCAST RUNNING MULTICAST  MTU:1500  Metric:1
          RX packets:0 errors:0 dropped:0 overruns:0 frame:0
          TX packets:0 errors:0 dropped:0 overruns:0 carrier:0
          collisions:0 txqueuelen:1000
          RX bytes:10303 (0.0 KB)  TX bytes:0 (0.0 KB)

lo        Link encap:Local Loopback
          inet addr:127.0.0.1  Mask:255.0.0.0
          inet6 addr: ::1/128 Scope:Host
          UP LOOPBACK RUNNING  MTU:65536  Metric:1
          RX packets:164 errors:0 dropped:0 overruns:0 frame:0
          TX packets:164 errors:0 dropped:0 overruns:0 carrier:0
          collisions:0 txqueuelen:1
          RX bytes:12080 (12.0 KB)  TX bytes:12080 (12.0 KB)
enp0s3 로 현재 nat 어댑터로 구성이 되어 있고 신규로 enp0s8 어댑터에 대해서 호스트 전용 네트워크를 설정한다.
$ sudo vi /etc/network/interfaces
# This file describes the network interfaces available on your system
# and how to activate them. For more information, see interfaces(5).

source /etc/network/interfaces.d/*

# The loopback network interface
auto lo
iface lo inet loopback

# The primary network interface
auto enp0s3
iface enp0s3 inet dhcp

# The host-only network interface 신규로 추가
auto enp0s8
iface enp0s8 inet static
address 192.168.253.101
netmask 255.255.255.0
network 192.168.253.0
설정이 완료 됐으면 network service를 재시작한다.
$ sudo systemctl restart networking
or
$ sudo /etc/init.d/networking restart
설정이 완료됐으면 host OS에서 ping을 날려보면
C:\Users\hkwon>ping 192.168.253.101

Ping 192.168.253.101 32바이트 데이터 사용:
192.168.253.101의 응답: 바이트=32 시간<1ms TTL=64
192.168.253.101의 응답: 바이트=32 시간<1ms TTL=64
192.168.253.101의 응답: 바이트=32 시간<1ms TTL=64
192.168.253.101의 응답: 바이트=32 시간<1ms TTL=64

192.168.253.101에 대한 Ping 통계:
    패킷: 보냄 = 4, 받음 = 4, 손실 = 0 (0% 손실),
왕복 시간(밀리초):
    최소 = 0ms, 최대 = 0ms, 평균 = 0ms
ssh 클라이언트로 접속 해서 이제 작업하면 된다~
이상!