RabbitMQ, PHP, Node.js를 활용해 GCM push 처리하기

개인적으로 아는 형님과 함께 mvp작업을 진행하고 있는 halftime이라는 안드로이드앱의 push 기능의 구현을 고민하면서 처음에는 실시간으로 php(phalcon framework)로 만든 api서버에서 직접 gcm push처리를 하려고 작업을 진행 중 이었다.
진행하면서 계속 느끼는건 push는 보내면 좋고 안보내도 그리 타격(?) 있는 서비스 타입인 것 같다. 그리고 또 다음과 같은 고민이 들기 시작했다.
- 만약 얘 때문에 CUD 처리 작업 시간이 현저히 늘어나 api서버가 뻗는다.
- gcm서버가 순간 접속이 안되어 타임아웃이 나서 api서버가 뻗는다.
- 혹시(?)나 대용량 푸쉬작업이 진행되서 댓글 하나 등록하는데 30초가 걸리면서 api 서버가 뻗는다.
위 같은 상황이 발생된다면(?) 매우 해피하겠지만 mvp에서 저런 상황을 쉽게 오지않으리라는건 99% 확실하다. mvp의 핵심가치가 빨리 전달하는 것에 가장 큰 목표가 있긴 하지만 내 마음의 짐도 덜 수 없는 어플리케이션이라면 어찌 사람들의 마음을 움직이리오.
가장 빠르게 구현 해 볼 수 있는 메세지큐 시스템 아키텍처를 도입해보기로 했다.
rabbitmq나 activemq는 web socket으로 채팅 만들어보는 node.js 튜토리얼이었나 예전에 잠깐 설치만 해봤던 정도고 메세지큐시스템은 아주 기본적인 지식만 있던차라 만들어 보면서 정리를 해보았다.
확실히 공공SI를 주로 진행하다보니 이런 류의 시스템을 설치해서 사용하는 일이 거의 없다. 오픈소스 쓰는걸 매우 주저하는 곳들이 대부분이다보니.. EAI 상용 솔루션 보면 메세지큐를 사용하기도 했었는데 솔루션에서 제공해주는 API만 주로 썼지 내부 구조라던지 이런건 별로 중요치는 않았으니까.. 갑자기 슬퍼지네 ㅠㅠ
여하간 여러가지 메시지큐 관련 오픈소스들을 검토해보니 가장 많이 쓰이고 있는 rabbitmq가 그나마 장애 상황이나 트러블 슈팅하는데 도움이 될 것 같아서 메시지큐 시스템은 rabbitmq로 정하고, api서버는 원래 php로 작성하던 것이니 sender는 php가 되고 receiver는 고민 끝에 쉽게 접근할 수 있고 빠르게 처리할 수 있는 node.js로 결정하고 하나씩 정리해 본다.
quara 질답 선정 할때 참조했던 내용인데 다양한 얘기를 들어 볼수 있어서 읽어 보길 권한다.
기본적인 아키텍처는 아래의 그림과 같이 Publish–subscribe 이라는 기본적인 메세지 패턴을 사용해서 최종적으로 gcm으로 푸쉬를 전송하고 결과를 처리하는 구조이다.
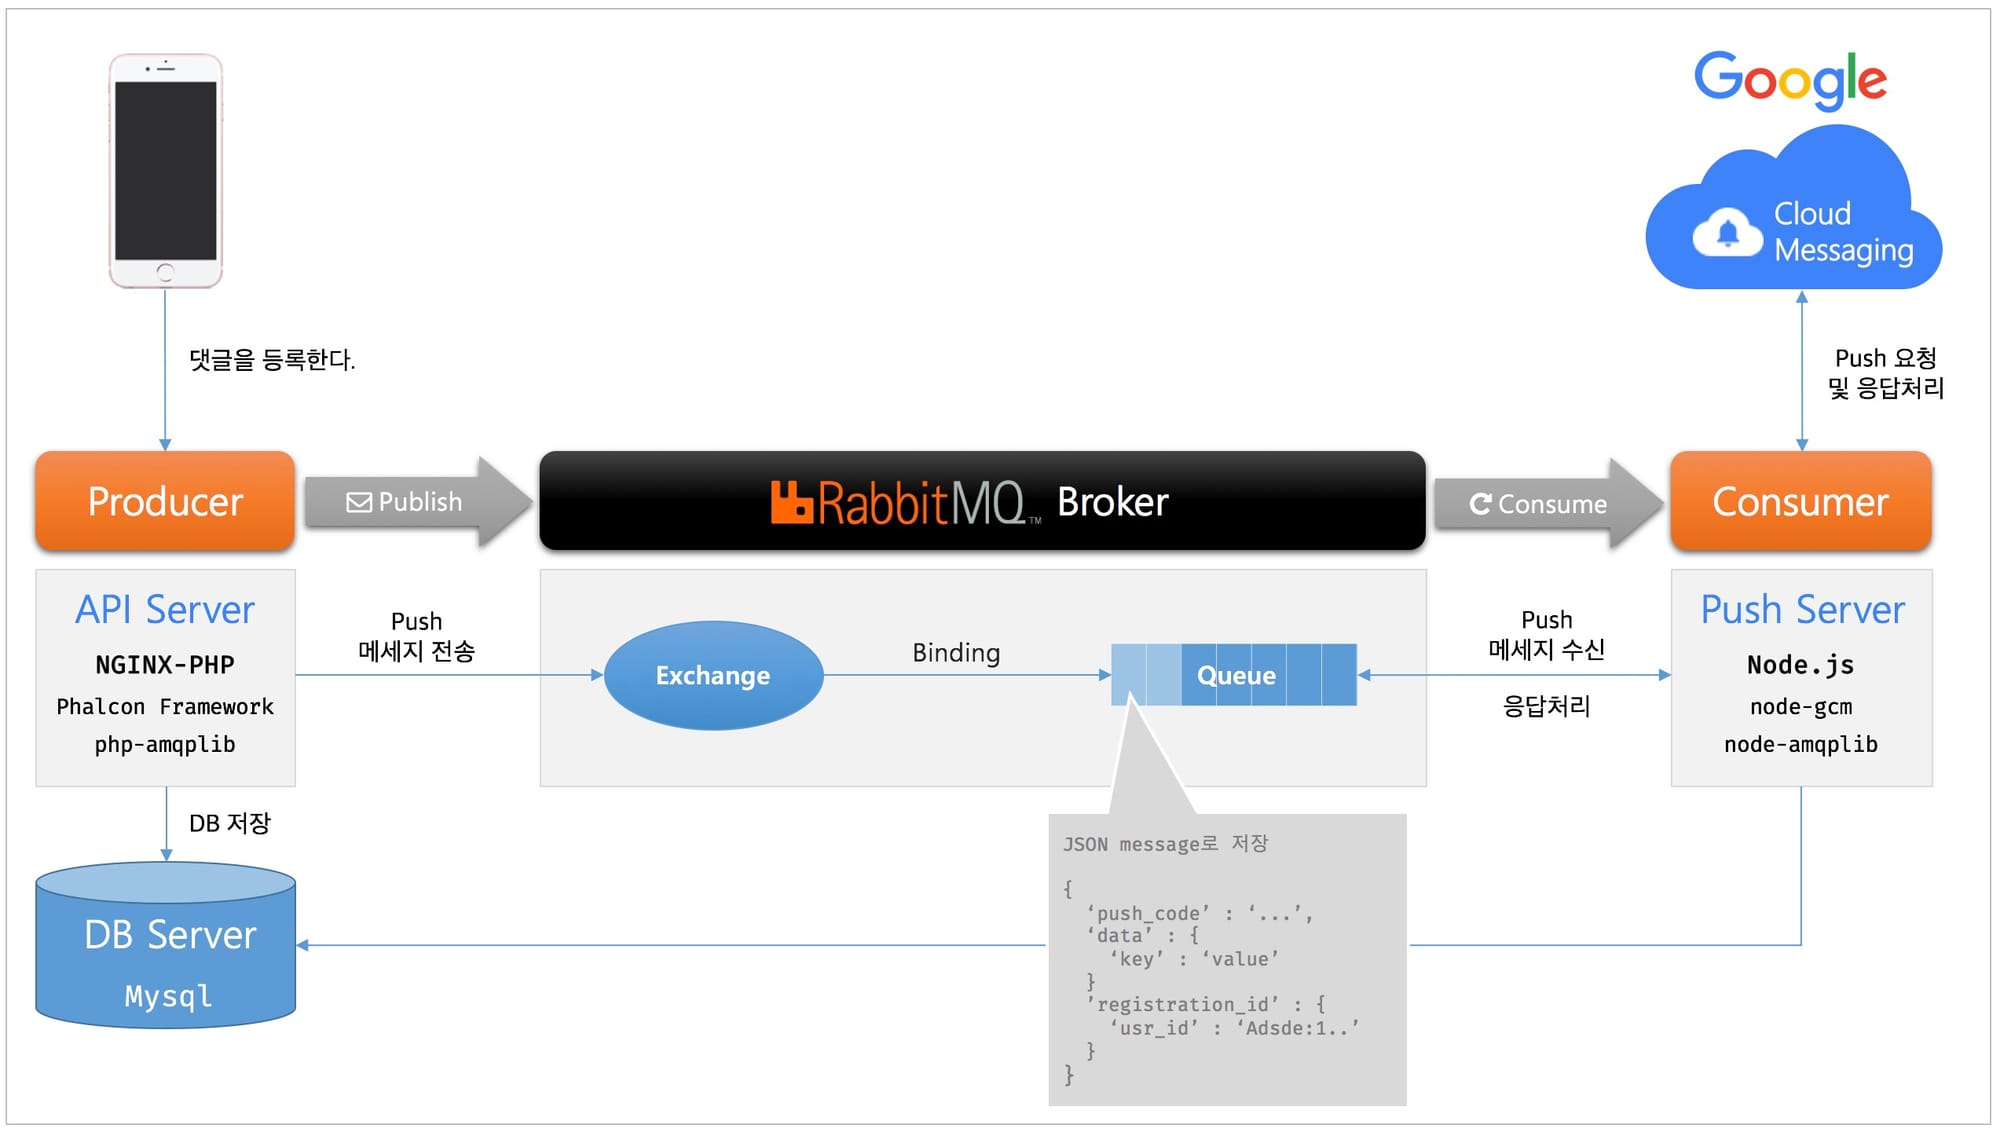
정리 순서는 rabbitmq 생성 및 설정, consumer 생성, producer 생성순으로 진행한다.
RabbitMQ란?
RabbitMQ는 간단히 요약하면 AMQP(Advanced Message Queueing Protocol)를 활용해 좀 더 쉽게 메세지-큐를 이용해 메세지를 전송/저장/관리하거나 받을 수 있는 기능을 제공하는 메세지 브로커(message broker or queue manager)라는 이름으로 불리는 오픈소스 소프트웨어다.
이기종간에 메세지 전달이나 서로 다른 프로세스간의 메세지 전달, 대용량 데이터 배치 처리, non-blocking 조작이나 푸쉬 서비스, 비동기 처리 등의 다양한 상황에서 활용이 가능한 메시지큐 처리 시스템이다.
큐에 쌓인 정보는 메세지를 큐에서 제거하거나 클라이언트가 소비하지 않는 이상 디스크, 메모리 등에 계속 저장하고 가지고 있는 형태이다. (이건 설정 옵션에 따라 다양하게 설정하고 이용할 수 있을 것 같다.)
보내는 메세지는 간단한 텍스트 메세지부터 바이너리 정보까지 어떤한 종류도 될 수 있다.

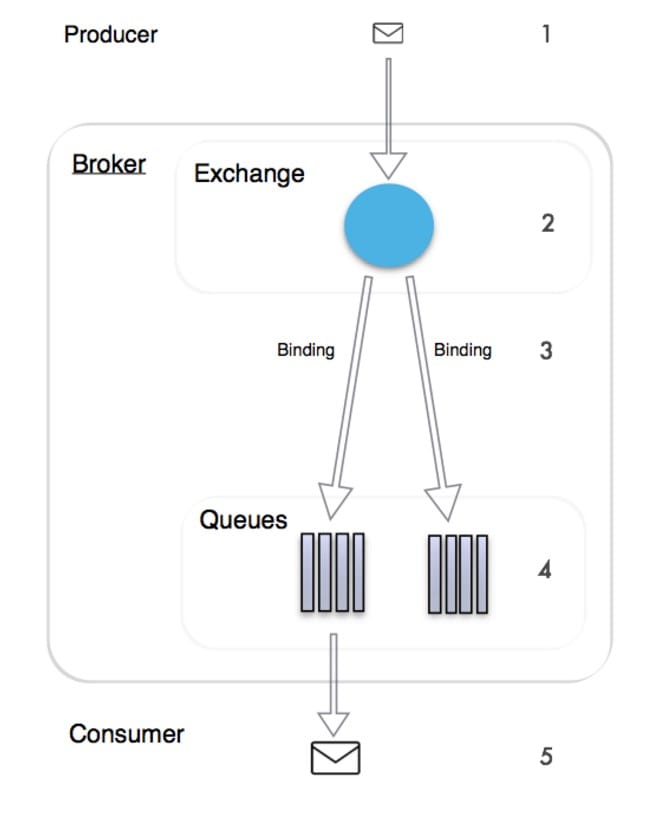
기본적인 아키텍처는 매우 간단하다. 생성자(Producer)로 불리는 클라이언트 어플리케이션은 메세지를 생성하고 브로커에 전달하는 역할을 한다. 브러커는 내부적으로 exchange와 queue로 구분되어 있고 exchange를 통해 메세지를 라우팅 할 수도 있고 바로 queue로 메세지를 보낼 수도 있다.
소비자(Consumer)로 불리는 어플리케이션은 queue에 접속해서 메시지를 받아내려오고(consume) 구독처리(subscribe) 하는 기본적인 흐름을 가지고 있다.
이 예제도 Publish–subscribe 이라는 기본적인 메세지 패턴을 사용해서 간단하게 구현해 볼 예정이다.
RabbitMQ Installation
실제 서버 작업은 centos에서 진행하지만 로컬개발을 위해 mac에서 설치를 먼저 진행한다.
mac에서 설치
brew를 통해서 아래와 같이 설치할 수 있다.
$ brew search rabbitmq
homebrew/versions/rabbitmq30  rabbitmq			    rabbitmq-c
$
$ brew install rabbitmq
==> Downloading https://www.rabbitmq.com/releases/rabbitmq-server/v3.5.6/rabbitmq-server-mac-standalone-3.5.6.tar.gz
######################################################################## 100.0%
==> /usr/bin/unzip -qq -j /usr/local/Cellar/rabbitmq/3.5.6/plugins/rabbitmq_management-3.5.6.ez rabbitmq_management-3.5.6/priv/www/cli/rabbitmqadmin
==> Caveats
Management Plugin enabled by default at http://localhost:15672

Bash completion has been installed to:
  /usr/local/etc/bash_completion.d

To have launchd start rabbitmq at login:
  ln -sfv /usr/local/opt/rabbitmq/*.plist ~/Library/LaunchAgents
Then to load rabbitmq now:
  launchctl load ~/Library/LaunchAgents/homebrew.mxcl.rabbitmq.plist
Or, if you don't want/need launchctl, you can just run:
  rabbitmq-server
==> Summary
🍺  /usr/local/Cellar/rabbitmq/3.5.6: 1039 files, 28M, built in 64 seconds
launchctl에 등록해서 쓰지는 않을 예정이므로 수동으로 시작한다.
Centos 6.6 설치
맥에서의 설치보단 약간 복잡하다. 공식 문서에서는 Erlang Solutions에서 제공하는 패키지로 설치할 것을 강력하게(?) 권고하고 있다.
실제 설치 작업 진행 해보니 진짜 그게 젤 편하다 ㅎㅎ
아래는 설치 로그이다. 참고만 하면 될 것 같다.
그리고 EPEL 설치는 EPEL FAQ를 참조하면 된다.
$ yum install epel-release
$ yum repolist
... 생략
epel    Extra Packages for Enterprise Linux 6 - x86_64   11,915
... 생략
repolist: 20,543

Install repo

$ wget http://packages.erlang-solutions.com/erlang-solutions-1.0-1.noarch.rpm

$ rpm -Uvh erlang-solutions-1.0-1.noarch.rpm

Install erlang

$ yum install erlang

Installed:
  erlang.x86_64 0:18.2-1.el6
... 생략
Dependency Updated:
  erlang-asn1.x86_64 0:18.2-1.el6   ...수많은 dependency
Complete!

$ wget http://www.rabbitmq.com/releases/rabbitmq-server/v3.6.0/rabbitmq-server-3.6.0-1.noarch.rpm
$ rpm --import http://www.rabbitmq.com/rabbitmq-signing-key-public.asc
$ rpm -Uvh rabbitmq-server-3.6.0-1.noarch.rpm
준비 중...               ########################################### [100%]
   1:rabbitmq-server        ########################################### [100%]
$ service rabbitmq-server start
Starting rabbitmq-server: SUCCESS
rabbitmq-server.
$ service rabbitmq-server status
Status of node rabbit@ssn1 ...
[{pid,14080},
 {running_applications,[{rabbit,"RabbitMQ","3.6.0"},
                        {mnesia,"MNESIA  CXC 138 12","4.13.2"},
                        {os_mon,"CPO  CXC 138 46","2.4"},
                        {xmerl,"XML parser","1.3.9"},
                        {rabbit_common,[],"3.6.0"},
                        {ranch,"Socket acceptor pool for TCP protocols.",
                               "1.2.1"},
                        {sasl,"SASL  CXC 138 11","2.6.1"},
                        {stdlib,"ERTS  CXC 138 10","2.7"},
                        {kernel,"ERTS  CXC 138 10","4.1.1"}]},
 {os,{unix,linux}},
 {erlang_version,"Erlang/OTP 18 [erts-7.2] [source-e6dd627] [64-bit] [smp:2:2] [async-threads:64] [hipe] [kernel-poll:true]\n"},
 {memory,[{total,42465984},
          {connection_readers,0},
          {connection_writers,0},
          {connection_channels,0},
          {connection_other,0},
          {queue_procs,2808},
          {queue_slave_procs,0},
          {plugins,0},
          {other_proc,18716448},
          {mnesia,60888},
          {mgmt_db,0},
          {msg_index,34392},
          {other_ets,904888},
          {binary,23584},
          {code,17375997},
          {atom,662409},
          {other_system,4684570}]},
 {alarms,[]},
 {listeners,[{clustering,25672,"::"},{amqp,5672,"::"}]},
 {vm_memory_high_watermark,0.4},
 {vm_memory_limit,1628043673},
 {disk_free_limit,50000000},
 {disk_free,46008516608},
 {file_descriptors,[{total_limit,924},
                    {total_used,2},
                    {sockets_limit,829},
                    {sockets_used,0}]},
 {processes,[{limit,1048576},{used,129}]},
 {run_queue,0},
 {uptime,11},
 {kernel,{net_ticktime,60}}]
서버가 잘 시작되는지 테스트 해본다.
$ rabbitmq-server start
rabbitmq-server start

              RabbitMQ 3.5.6. Copyright (C) 2007-2015 Pivotal Software, Inc.
  ##  ##      Licensed under the MPL.  See http://www.rabbitmq.com/
  ##  ##
  ##########  Logs: /usr/local/var/log/rabbitmq/rabbit@localhost.log
  ######  ##        /usr/local/var/log/rabbitmq/rabbit@localhost-sasl.log
  ##########
              Starting broker... completed with 10 plugins.
Management Plugin
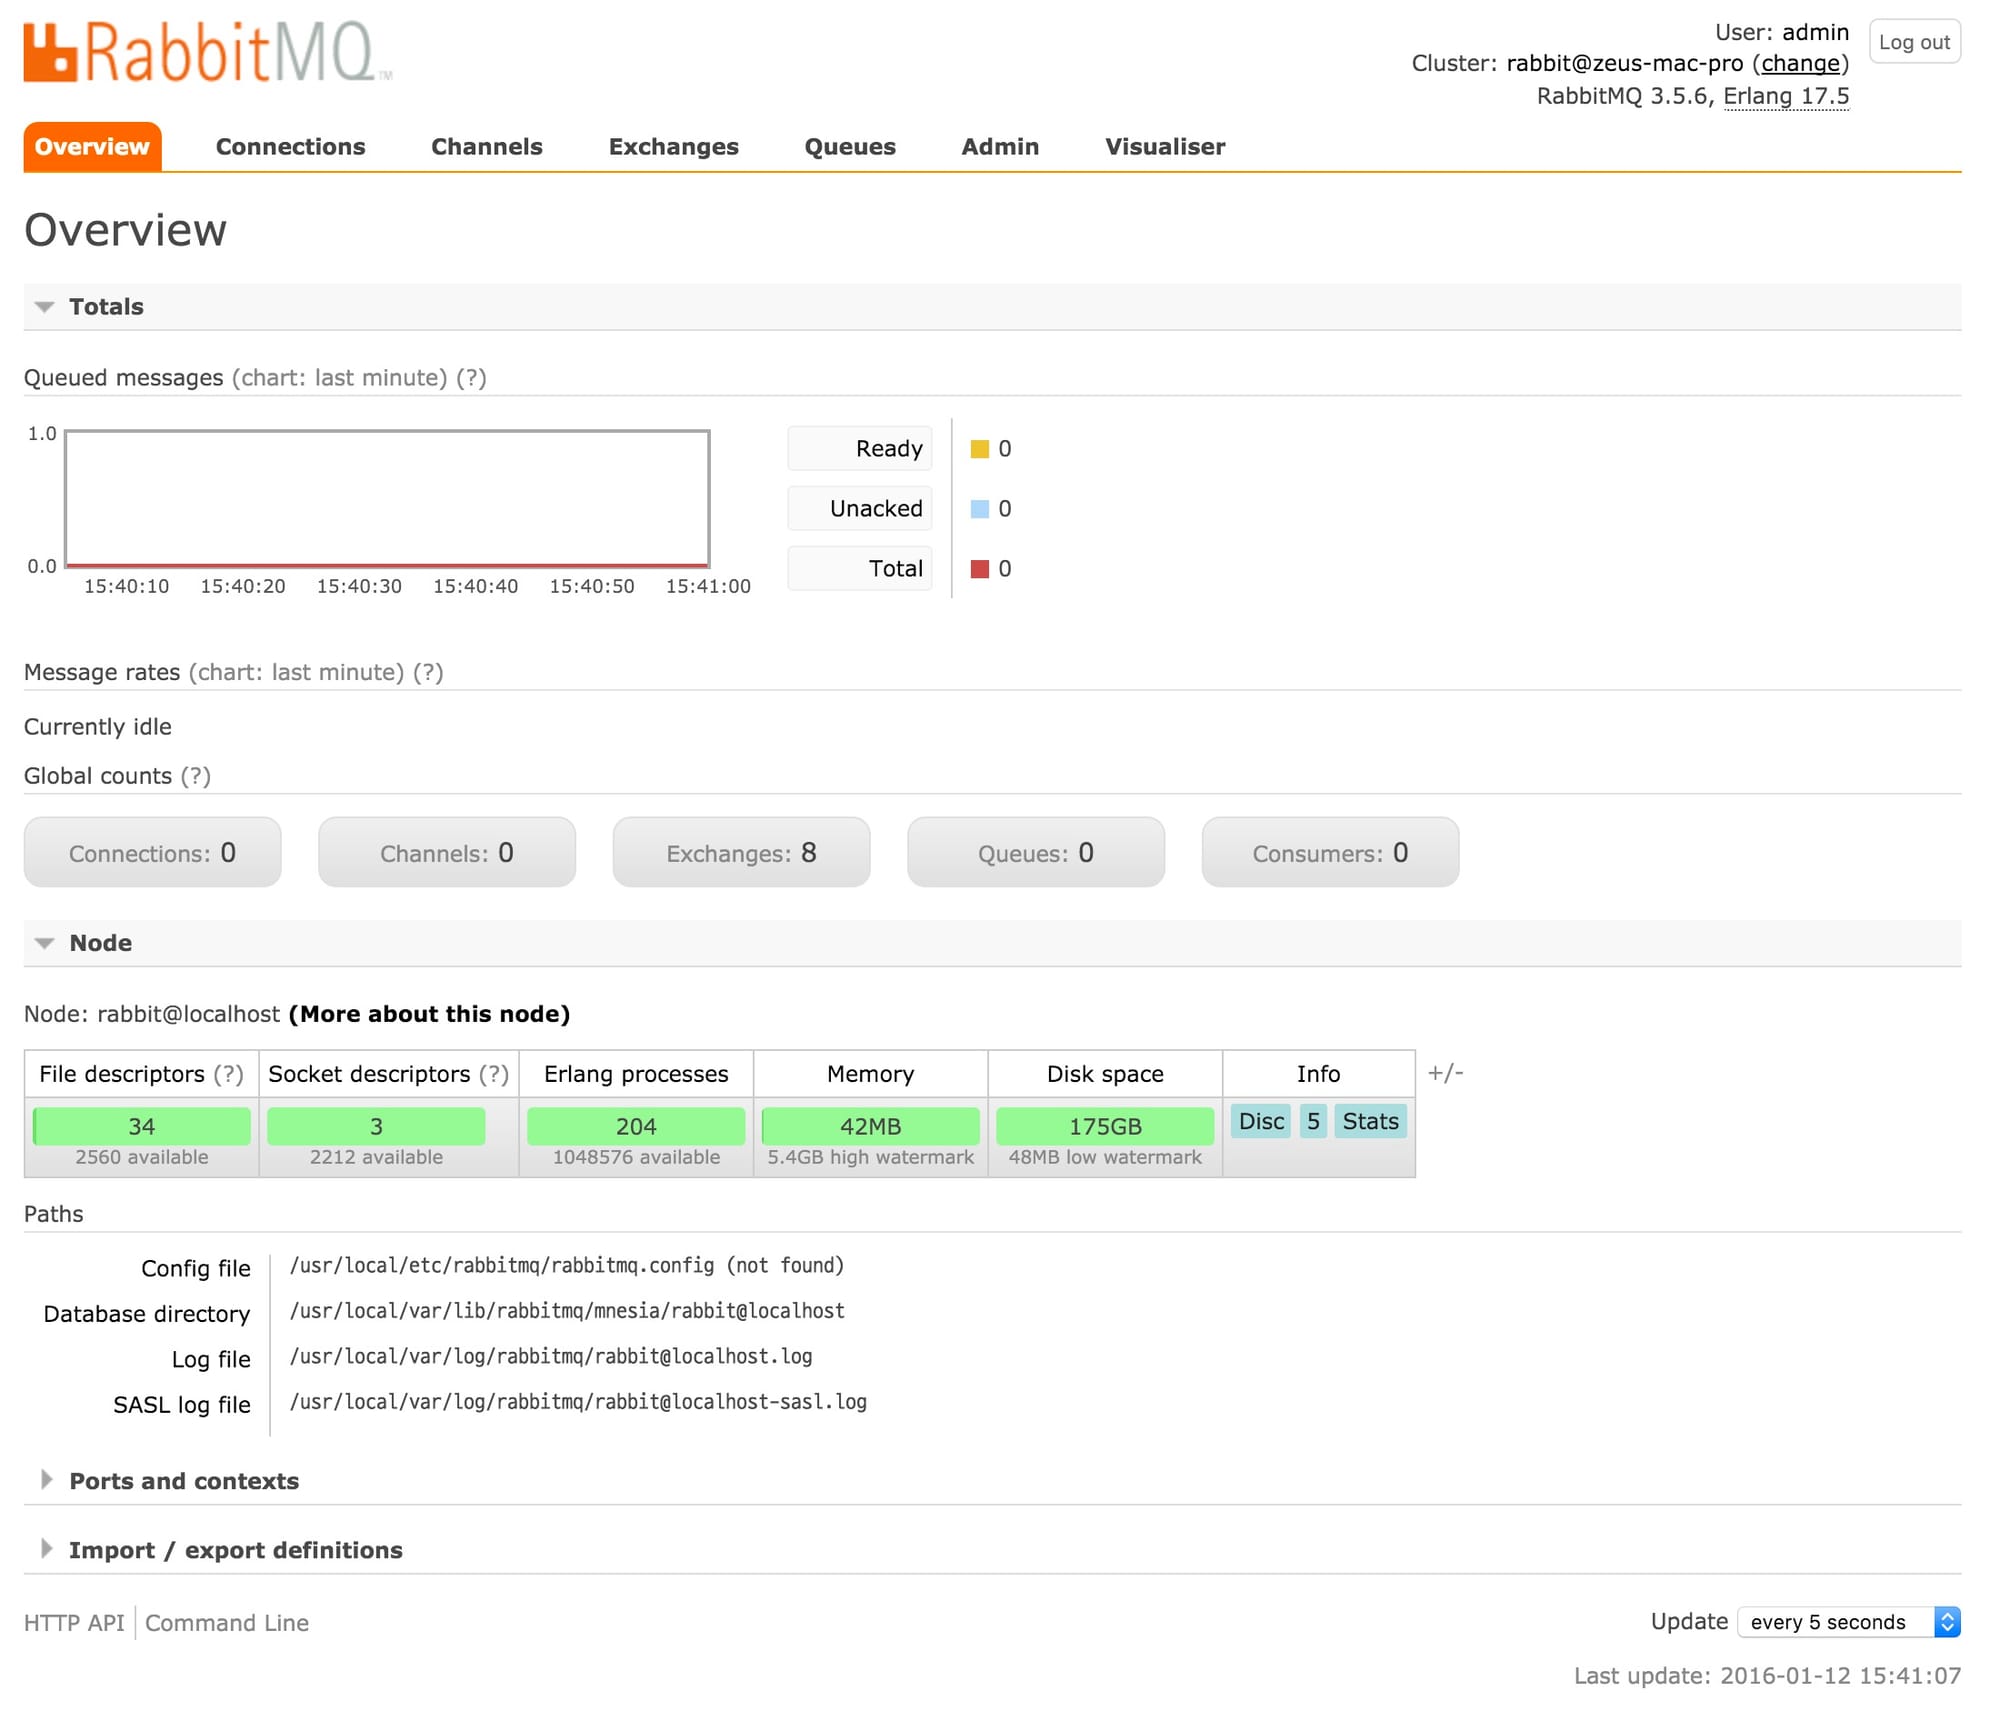
rabbitmq-management 플러그인은 웹(http)상에서 rabbitmq 서버의 상태를 모니터링하고 관리 할 수 있는 플러그인이고, 브라우저에서 제공되는 UI와 command line툴을 제공한다.
대부분의 튜토리얼이 rabbitmq-management 플러그인이 disable로 된걸 enable로 변경하는 것으로 되어 있던데, 버전업이 되면서 기본적으로 아래의 플러그인들은 enable되는 것 같다..
=INFO REPORT==== 12-Jan-2016::14:21:22 ===
Server startup complete; 10 plugins started.
 * rabbitmq_management_visualiser
 * rabbitmq_management
 * rabbitmq_web_dispatch
 * webmachine
 * mochiweb
 * rabbitmq_mqtt
 * rabbitmq_stomp
 * rabbitmq_management_agent
 * rabbitmq_amqp1_0
 * amqp_client
만약 플러그인을 수동으로 enable시키려면 아래의 커맨드로 설치 가능한다.
$ rabbitmq-plugins enable rabbitmq_management
The following plugins have been enabled:
  mochiweb
  webmachine
  rabbitmq_web_dispatch
  amqp_client
  rabbitmq_management_agent
  rabbitmq_management

Applying plugin configuration to rabbit@appserver... started 6 plugins.
enable되면 아래와 같이 웹으로 접속이 가능한다.
- http://server-name:15672/ : web ui는 기본적으로 15672 포트로 접속 가능하다.
- http://server-name:15672/api/ : rest api도 제공되고 해당 url에서 사용이 가능하다.
- http://server-name:15672/cli/ :
rabbitmqadmin은 여기서 다운로드 가능한다.
권한 관리 및 설정
Access Control
rabbitmq-server는 설치 시 기본적으로 guest 유저를 생성시켜준다.
guest 유저는 로컬호스트에서만 접속할 경우 사용되는 유저로 브로커에 리모트로 접근이 불가능하다. 로컬에서만 사용하려면 guest유저에 권한을 주고 사용해도 되지만 실제 사용하는 유저를 생성하고 권한을 부여하는 것을 권고하고 있는 것 같다.
유저 생성은 관리나 모니터링을 할 수 있는 관리자 유저와 실제 사용 유저로 나뉘어서 관리하는 것이 좋을 것 같다.
management 콘솔은 guest유저로도 접근은 가능하고 웹UI에서 변경도 가능한다.
물로 커맨드 라인 명령으로도 유저 생성과 권한을 줄 수 있다.
$ rabbitmqctl add_user admin password
Creating user "admin" ...
$
$ rabbitmqctl set_user_tags admin administrator
Setting tags for user "admin" to [administrator] ...
위의 예제는 admin 유저를 생성하고 Permission을 administrator를 주는 명령어이다.
rabbitmq의 유저 퍼미션은 tag로 관리되고 줄 수 있는 Permission은 다음과 같다.
| Tag | capabilities |
|---|---|
| (None) | management 플러그인에 아무런 권한이 없다. |
| management | Anything the user could do via AMQP plus:
|
| policymaker | 모든 `management` 권한에 추가하여
|
| monitoring | 모든 `management` 권한에 추가하여
|
| administrator | 모든 `policymaker`와 `monitoring` 권한에 추가하여
|
권한을 주면 이제 모니터링과 정책생성 권한을 가진 관리자 권한으로 웹UI로 로그인이 가능하다.
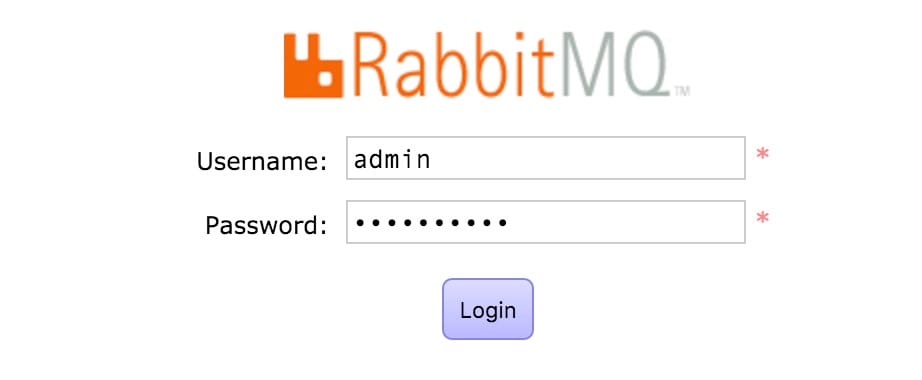
로그인 하면 아래 처럼 여러가지 설정 메뉴를 통해 관리가 가능하다.
모든 작업은 Web UI에서 설정 가능하지만 Production 환경에서는 방화벽등으로 접근 자체가 불가한 경우가 많으므로 phyton command line script인 rabbitmqadmin와 rabbitmqctl을 사용하여 설정한다.
(개인적으로도 나중으 위해 자동화 할 수 있는 스크립트가 필요한 경우가 종종 발생해서 스크립트로 처리하는걸 선호하는 편이긴 하다.)
Web UI에서 작업은 별도로 설명이 필요 없이도 간단하게 매뉴얼 보면 모두 아래의 작업이 가능하다.
Vitual Hosts, Users, Permissions
Production환경에 따라서 가상호스트(Virtual Hosts)를 설정 할 수 있다.
브로커 서버가 용도에 따라 한가지 큐만 서비스한다면 기본 가상 호스트인 /를 사용하여 서비스하면 되고 용도에 따라 여러가지 독립된 서비스(ex 모바일, 웹, c/s, 서비스1, 서비스2 등)에서 사용된다면 서비스 용도 별로 유저와 가상호스트를 별도 관리하는 것을 권장하고 있다.
이렇게 가상호스트를 설정함으로 인해서 조직화된 서비스 별 권한 관리라던지 모니터링에도 강점을 가지고 있다고 설명하고 있다.
앱서버에서 푸쉬 용도로 서비스를 시작하지만 나중에 email이라던지 sms 서비스도 가능하기에 별도로 가상호스트를 아래와 같이 설정한다.
우선 guest 유저는 이제 사용하지 않으므로 guest 유저를 삭제한다.
rabbitmqctl delete_user guest
Deleting user "guest" ...
기본 가상호스트는 사용하지 않고 서비스 별로 가상호스트를 나누기 위해 가상호스트를 생성한다.
rabbitmqctl add_vhost halftime-push
Creating vhost "halftime-push" ...
새로 만든 호스트에 접속할 유저를 생성한다. 푸시 서비스용도이므로 적절한 유저 이름으로 생성하고 해당 유저는 모니터링이나 관리자 권한은 없이 management 권한(tag)만 부여한다.
$ rabbitmqctl add_user halftime_push_service password
Creating user "halftime_push_service" ...
$
$ rabbitmqctl set_user_tags halftime_push_service management
Setting tags for user "halftime_push_service" to [management] ...
유저가 제대로 생성되었는지 확인한다.
$ rabbitmqctl list_users
Listing users ...
admin	[administrator]
halftime_push_service	[management]
이제 생성한 가상호스트를 push_service 유저가 접근가능하도록 설정한다.
set_permissions [-p vhostpath] {user} {conf} {write} {read}
$ rabbitmqctl set_permissions -p halftime-push halftime_push_service ".*" ".*" ".*"
Setting permissions for user "halftime_push_service" in vhost "halftime-push" ...
$ rabbitmqctl set_permissions -p halftime-push admin ".*" ".*" ".*"
Setting permissions for user "admin" in vhost "halftime-push" ...
가상호스트 설정을 확인하고, 제대로 권한이 부여됐는지 확인한다.
$ rabbitmqctl list_vhosts
Listing vhosts ...
/
halftime-push
$
$ rabbitmqctl list_permissions -p /
Listing permissions in vhost "/" ...
$
$ rabbitmqctl list_permissions -p halftime-push
Listing permissions in vhost "halftime-push" ...
halftime_push_service	halftime_push_service	.*	.*
rabbitmqadmin
이제 기본적인 가상호스트, 유저와 관련된 환경 설정은 마무리 하고 management plugin에 포함된 rabbitmqadmin을 이용해 상세 설정을 수행한다.
rabbitmqadmin 설치
매뉴얼에는 http://server-name:15672/cli/ 에서 phyton 스크립트를 다운로드해서 사용하라고 나와 있던데 brew로 설치 했더니 이미 command line tool은 설치가 되어 있다.
버전 차이는 있을걸로 보이며, 만약 해당 스크립트가 존재하지 않는다면 위의 url에서 다운로드 받아서 적절히 수행 가능한 위치에 넣어두고 사용하면 된다.
$ ls -al /usr/local/sbin/
total 64
drwxr-xr-x  10 hkwon  admin  340  1 12 14:08 ./
drwxr-xr-x  22 hkwon  admin  748 12 15 09:58 ../
lrwxr-xr-x   1 hkwon  admin   35 10 12 10:56 php-fpm@ -> ../Cellar/php56/5.6.14/sbin/php-fpm
lrwxr-xr-x   1 hkwon  admin   37 10 12 10:56 php56-fpm@ -> ../Cellar/php56/5.6.14/sbin/php56-fpm
lrwxr-xr-x   1 hkwon  admin   47  1 12 14:08 rabbitmq-defaults@ -> ../Cellar/rabbitmq/3.5.6/sbin/rabbitmq-defaults
lrwxr-xr-x   1 hkwon  admin   42  1 12 14:08 rabbitmq-env@ -> ../Cellar/rabbitmq/3.5.6/sbin/rabbitmq-env
lrwxr-xr-x   1 hkwon  admin   46  1 12 14:08 rabbitmq-plugins@ -> ../Cellar/rabbitmq/3.5.6/sbin/rabbitmq-plugins
lrwxr-xr-x   1 hkwon  admin   45  1 12 14:08 rabbitmq-server@ -> ../Cellar/rabbitmq/3.5.6/sbin/rabbitmq-server
lrwxr-xr-x   1 hkwon  admin   43  1 12 14:08 rabbitmqadmin@ -> ../Cellar/rabbitmq/3.5.6/sbin/rabbitmqadmin
lrwxr-xr-x   1 hkwon  admin   41  1 12 14:08 rabbitmqctl@ -> ../Cellar/rabbitmq/3.5.6/sbin/rabbitmqctl
Exchanges 생성
메세지 생성자(Producer)와 소비자(Consumer) 간의 rabbitmq broker 레이어는 크게 exchange와 queue로 나뉘어져 바인딩되는 구조로, 생성자(Producer)는 queue에 직접 메세지를 전달하지 않고, Exchange라는 브로커 레이어에게 메세지를 전달한다.
하나의 Exchange는 서로 다른 Queue 에 메세지를 라우팅해주는 책임이 있으며, Exchange와 Queue간의 연결은 Binding과 Routing Key를 통해서 이루어진다.
Exchange Type
Exchange는 성격에 따라 다음와 같은 type을 가진다.
| Tag | capabilities |
|---|---|
| Direct | direct exchange는 message routing key를 기반으로 같은 키로 정확히 맵핑된 `queue`에 메세지를 직접 전달한다. |
| Fanout | fanout exchange는 바운드 되어 있는 모든 `queue`에 메세지를 전달한다. |
| Topic | topic exchange는 routing key와 pattern에 매칭되는 모든 `queue`에 메세지를 전달한다. |
| Headers | headers exchange는 메세지 헤더 속성을 이용하여 `queue`에 메시지를 전달한다. |
각각의 용도에 맞게 type을 설정하고 Exchange를 생성하면 되겠다.
Optional Parameters
exchange 생성 시에는 몇가지 옵션을 줄 수 있다.
Durability=durable
rabbitmq 서버가 비정상적으로 종료되거나 Queue에 바인딩이 비정상 실패 할때 메세지가 유실되지 않고 서버 리스타트 시 보존할 수 있도록 하는 옵션autodelete=no
모든 Queue가 메세지를 바인딩하면 때 Exchange에서 메세지를 자동으로 삭제
Exchange 생성
다음과 같이 가장 많이 쓰이는 기본 타입인 Direct로 Exchange를 생성한다.
$ rabbitmqadmin declare exchange --vhost=halftime-push name=halftime-push-exchange type=direct -u admin -p password
exchange declared
guest 유저를 삭제했으므로 -u와 -p 옵션을 줘야 http api를 사용하여 처리가 가능하다.
Queue 생성
이제 실제 메세지를 저장할 buffer인 queue를 생성한다.
Optional Parameters
queue 생성 시에는 몇가지 옵션을 줄 수 있다.
durable=false
rabbitmq 서버가 비정상적으로 종료되거나 Consumer가 메세지를 처리 도중에 비정상 종료되어도 메세지가 유실되지 않고 서버 리스타트 시 보존할 수 있도록 하는 옵션autodelete=no
모든 Consumer가 메세지를 소비하고 connection을 끊을 때 큐에서 메세지를 자동으로 삭제그외 parameter
Message TTL | Auto expire | Max length | Max length bytes
Dead letter exchange | Dead letter routing key | Maximum priority
Queue 생성
$ rabbitmqadmin declare queue --vhost=halftime-push name=halftime-push-queue durable=true -u admin -p password
queue declared
Bindings 생성
Bindings는 Exchanges가 큐에게 메시지를 전달하기 위한 룰이다. Bindings는 Exchange types에 따라 사용되어 지는 routing key 속성을 가지고 있을 수 있다.
$ rabbitmqadmin declare binding --vhost=halftime-push source=halftime-push-exchange destination=halftime-push-queue routing_key=halftime-push-key destination_type=queue -u admin -p password
binding declared
exchange에서 exchange로 바인딩 시에는 destination_type이 exchange로 설정하면 된다.
설정 정보 확인
지금까지 생성한 정보는 web ui나 rabbitmqadmin의 list 명령어로 확인 가능하다.
$ rabbitmqadmin list queues vhost name node messages message_stats.publish_details.rate -u admin -p password
+---------------+---------------------+------------------+----------+------------------------------------+
|     vhost     |        name         |       node       | messages | message_stats.publish_details.rate |
+---------------+---------------------+------------------+----------+------------------------------------+
| halftime-push | halftime-push-queue | rabbit@localhost | 0        |                                    |
+---------------+---------------------+------------------+----------+------------------------------------+
Producer 생성
공식 홈페이지에서는 Java, .net, Ruby, Erlang 등 다양한 형태의 언어에서 사용가능하도록 client 모듈을 제공하고 있고, AMQP 스펙을 만족하는 라이브러리는 모두 쓸 수 있다.
나는 앱서버가 PHP(with Phalcon Framework)로 구현 했으므로 메세지 생성자는 PHP에서 구현하는 예제로 진행한다.
공식 튜토리얼페이지에 다양한 언어로 잘 설명되어 있으니 참조가 가능하다.
php-amqplib 설치
php에서 rabbitmq 작업을 진행하기 위해 php-amqplib을 설치한다.
composer는 로컬인스톨을 진행했기에 composer.json에 require 부분을 추가하고 install을 진행한다.
{
  "require": {
      "videlalvaro/php-amqplib": "2.5.*"
  }
}
composer를 통해 install을 실시한다.
$ php composer.phar install
Loading composer repositories with package information
Installing dependencies (including require-dev)
  - Installing videlalvaro/php-amqplib (v2.5.2)
    Downloading: 100%

Writing lock file
Generating autoload files
php-amqplib을 사용한 Producer 생성
Phalcon에서 php-amqplib을 사용하기 위해 bootstrap 파일에 autoload.php 를 추가한다.
// Use composer autoloader to load vendor classes
require_once __DIR__ . '/../../vendor/autoload.php';

--

// confing 설정에 host, port, vhost, exchange 등록
...
'rabbitmqHost'     => 'api.2halftime.com',
'rabbitmqPort'     => '5672',
'rabbitmqVhost'    => 'halftime-push',
'rabbitmqExchange' => 'halftime-push-exchange',
...
메시지를 생성하는 controller에서 php-amqplib을 사용하기 위해 라이브러리를 로드한다.
<?php
namespace Halftime\Controllers;

use PhpAmqpLib\Connection\AMQPStreamConnection;
use PhpAmqpLib\Message\AMQPMessage;
이제 메세지를 보내는 코드를 작성한다.
// configurataion.php
'rabbitmq' => array(
    'host'   => 'localhost',
    'port'   => '5672',
    'user'   => 'halftime_push_service',
    'passwd' => 'password',
    'vhost'  => 'halftime-push',
    'exchange'   => 'halftime-push-exchange',
    'routingKey' => 'halftime-push-key'
),

// ControlerBase.php
// 푸시 전송을 위해 rabbitmq 메세지 생성 및 전송
$connection = new AMQPStreamConnection(
    $this->config->rabbitmq->host,
    $this->config->rabbitmq->port,
    $this->config->rabbitmq->user,
    $this->config->rabbitmq->passwd,
    $this->config->rabbitmq->vhost);

$channel = $connection->channel();

$message = array();

$message["push_code"] = $push_code;
$message["title"] = "notification title";
$message["icon"] = "ic_launcher";
$message["body"] = "notification body";
$message["data"] = $data;
$message["registration_tokens"] = $registration_tokens;

$properties = array(
    'content_type' => 'text/plain',
    'type' => 'halftime.push.message'
);

$amqpMessage = new AMQPMessage(json_encode($message), $properties);

$channel->basic_publish(
    $amqpMessage,
    $this->config->rabbitmq->exchange,
    $this->config->rabbitmq->routingKey
);

$channel->close();
$connection->close();
rabbitmq를 사용하는 방법은 튜토리얼에도 많이 나와 있지만 가장 기본적인 Publish/Subscribe 패턴을 사용했고 publisher는 exchage에 메세지를 보내면 direct 방식으로 routingkey로 binding되어 있는 queue로 메시지를 전달해준다.
다른 방식을 진행을 원한다면 튜토리얼데로 그대로 따라해도 큰 문제는 없을 것 같다.
Consumer 생성
rabbitmq 공식 문서에 보면 매우 다양한 언어(Python, Java, Ruby, PHP, C#, Javascript, Go)로 consumer(client)를 작성할 수 있다.
웹서버나 기타 미들웨어를 설치하지 않고도 비교적 간단하고 빠르게 메세지를 처리 할 수 있도록 node.js를 통해서 consumer를 작성하기로 하였다.
node.js에서 ampq client 모듈은 여러가지 옵션이 있는데 그 중에 amqplib를 선정하였다.
(일단 github 의 star수가 제잎 높고, 최근까지 계속 업데이트 있는 듯 하다.)
그리고 halftime-push-queue로 들어온 메세지를 push 처리 해야 하므로 node-gcm 모듈도 함께 이용해서 처리한다.
물론 GCM 스펙에 나와 있는데로 http 스펙을 완성하고 직접요청하고 결과 작업을 진행해도 상관없지만, 해당 작업들을 훨씬 간편하고 작업할 수 있어서 node-gcm을 통해서 push처리하는 에제로 진행한다.
기본 package.json 생성
npm init를 통해 기본 package.json을 생성한다.
$ npm init
This utility will walk you through creating a package.json file.
It only covers the most common items, and tries to guess sensible defaults.

See `npm help json` for definitive documentation on these fields
and exactly what they do.

Use `npm install <pkg> --save` afterwards to install a package and
save it as a dependency in the package.json file.

Press ^C at any time to quit.
name: (half-time-push-server)
version: (1.0.0)
description: halftime push server
entry point: (index.js)
test command:
git repository:
keywords: push
author: hkwon77
license: (ISC)
About to write to /Users/hkwon/Development/workspace/half-time-push-server/package.json:

{
  "name": "half-time-push-server",
  "version": "1.0.0",
  "description": "halftime push server",
  "main": "index.js",
  "scripts": {
    "test": "echo \"Error: no test specified\" && exit 1"
  },
  "keywords": [
    "push"
  ],
  "author": "hkwon77",
  "license": "ISC"
}


Is this ok? (yes) yes
amqplib 패키지 설치
node.js에서 amqp 프로토콜 사용을 위해 amqplib을 설치한다.
$ npm install amqplib --save
npm WARN package.json half-time-push-server@1.0.0 No repository field.
npm WARN package.json half-time-push-server@1.0.0 No README data
amqplib@0.4.0 node_modules/amqplib
├── buffer-more-ints@0.0.2
├── bitsyntax@0.0.4
├── when@3.6.4
└── readable-stream@1.1.13 (string_decoder@0.10.31, isarray@0.0.1, inherits@2.0.1, core-util-is@1.0.2)
node-gcm 패키지 설치
안드로이드 디바이스로 push를 보내는 기능을 쉽게 사용하기 위해 node-gcm 패키지를 설치한다.
$ npm install node-gcm --save
npm WARN package.json half-time-push-server@1.0.0 No repository field.
npm WARN package.json half-time-push-server@1.0.0 No README data
node-gcm@0.13.1 node_modules/node-gcm
├── debug@0.8.1
├── lodash@3.10.1
└── request@2.67.0 (aws-sign2@0.6.0, forever-agent@0.6.1, tunnel-agent@0.4.2, oauth-sign@0.8.0, is-typedarray@1.0.0, caseless@0.11.0, stringstream@0.0.5, isstream@0.1.2, json-stringify-safe@5.0.1, extend@3.0.0, tough-cookie@2.2.1, node-uuid@1.4.7, qs@5.2.0, combined-stream@1.0.5, hawk@3.1.2, bl@1.0.0, mime-types@2.1.9, form-data@1.0.0-rc3, har-validator@2.0.3, http-signature@1.1.0)
Node.js Consumer 작성
이제 rabbitmq의 queue에서 메세지를 받아와서 push처리는 어플리케이션을 작성한다.
아래 코드는 CloudAMQP with Node.js에 나와 있는 예제를 사용하였다. Production 레벨에서는 이 코드를 기반으로 인증/로깅/gcm response처리 등의 일부 기능을 수정해서 사용하였다.
샘플에서는 Wascally나 Jackrabbit 모듈(둘 다 amqplib을 사용하기 편하게 wrapping한 모듈 같아 보임)을 사용한 예제도 나와 있으니 참고 바란다 .
var amqp = require('amqplib/callback_api');
var configuration = require('./configuration.js');

// if the connection is closed or fails to be established at all, we will reconnect
var amqpConn = null;

// GCM에서 발급받은 API_KEY
var sender = new gcm.Sender("GCM_API_KEY");

function start() {
  // amqp://usename:password@localhost/vhost_name 형식의 uri를 사용한다.
  amqp.connect(configuration.getURL, function(err, conn) {
    if (err) {
      console.error("[AMQP]", err.message);
      return setTimeout(start, 1000);
    }

    conn.on("error", function(err) {
      if (err.message !== "Connection closing") {
        console.error("[AMQP] conn error", err.message);
      }
    });

    conn.on("close", function() {
      console.error("[AMQP] reconnecting");

      return setTimeout(start, 1000);
    });

    console.log("[AMQP] connected");

    amqpConn = conn;

    whenConnected();
  });
}

function whenConnected() {
  startWorker();
}

// A worker that acks messages only if processed succesfully
function startWorker() {
  amqpConn.createChannel(function(err, ch) {
    if (closeOnErr(err)) {
      return;
    }

    ch.on("error", function(err) {
      console.error("[AMQP] channel error", err.message);
    });

    ch.on("close", function() {
      console.log("[AMQP] channel closed");
    });

    ch.prefetch(10);

    ch.assertQueue("halftime-push-queue", { durable: true }, function(err, _ok) {
      if (closeOnErr(err)) {
        return;
      }

      ch.consume("halftime-push-queue", processMsg, { noAck: false });

      console.log("Worker is started");
    });

    function processMsg(msg) {
      work(msg, function(ok) {
        try {
          if (ok) {
            ch.ack(msg);
          } else {
            ch.reject(msg, true);
          }
        } catch (e) {
          closeOnErr(e);
        }
      });
    }
  });
}

// queue 처리
function work(msg, cb) {
  try {
    var q_message = msg.content.toString();

    if (q_message) {
      q_message = JSON.parse(q_message);
    }

    // Create a gcm message
    var gcm_message = new gcm.Message();

    // Add message data
    gcm_message.addData(q_message.data);

    // Add notification payload as key value
    gcm_message.addNotification('title', q_message.title);
    gcm_message.addNotification('body',  q_message.body);
    gcm_message.addNotification('icon',  q_message.icon);

    var regTokens = [];

    // 본 예제는 client에서 아아디:registration_id 배열로 던져서
    // 아래처럼 처리
    for(var key in q_message.registration_tokens){
      regTokens.push(q_message.registration_tokens[key]);
    }

    // send push and retrying a specific number of times (3)
    sender.send(gcm_message, {registrationTokens : regTokens}, 3, function (err, response) {
      if (err) {
        console.error("[GCM] push error", err);
      } else {
        console.log("[GCM] sending push success!");
      }
    });
  } catch (e) {
    console.error("[AMQP] error", e);
  }

  cb(true);
}

function closeOnErr(err) {
  if (!err) {
    return false;
  }

  console.error("[AMQP] error", err);

  amqpConn.close();

  return true;
}

start();
이제 php로 만든 하프타임 앱의 api 서버에서 특정 액션이 일어날 경우 rabbitmqd의 exchange로 메세지를 전달하면 direct로 queue에 해당 메세지가 쌓이게 된다.
node-gcm과 amqplib 모듈로 생성한 node.js push 애플리케이션은 queue를 지속적으로 바라보며 들어오는 메세지를 push처리 한다.
GCM 처리 시 주의 사항
실제 push 날리는 작업은 매우 수월하게 작성되고 실행되지만 아래의 후속작업도 반드시 필요하다.
그래서 gcm http connection 서버를 이용해 push 처리 중 필요한 주의사항에 대해 간단히 정리한다.
GCM 서버 방화벽 처리
만약 방화벽이 적용된 존에서 서비스되는 서버라면 gcm은 기본적으로 5228 포트를 사용하지만 때때로 5229, 5230 포트도 사용된다.
그리고 특정 구글 GCM 서버의 IP를 제공하지 않으므로 방화벽 오픈 시 Google's ASN of 15169 를 사용하라 나와있는데 필요 시 해당 정보를 서칭해봐야 할 것 같다.
방화벽 처리 information
If your organization has a firewall that restricts the traffic to or from the Internet, you need to configure it to allow connectivity with GCM in order for your GCM client apps to receive messages. The ports to open are: 5228, 5229, and 5230. GCM typically only uses 5228, but it sometimes uses 5229 and 5230. GCM doesn't provide specific IPs, so you should allow your firewall to accept outgoing connections to all IP addresses contained in the IP blocks listed in Google's ASN of 15169.
GCM Response 처리
GCM 호출 후 http 반환코드는 두가지 경우만 존재한다.
- 메시지 전송이 성공적이면 http 반환코드는 200을 전달한다. 이 경우 결과안에 메세지 상태에 대한 정보들이 함께 전송된다.
- GCM이 요청 처리를 거부한 경우 200이 아닌 코드(400, 401, 5xx)를 반환한다.
(처음에node-gcm에서 err가 황당하게 달랑 400 코드만 리턴해서 식겁했는데 reponse를 찍어보니 에러코드도 함께 리턴이 되었다;; 참고바람)
| Response | 설명 |
|---|---|
| 200 | 정상적으로 메세지가 처리 된 경우. 후속 작업 처리를 위해 더 많은 정보는 Downstream HTTP message response body (JSON)를 참조한다. |
| 400 | _JSON 형식으로 Request 한 경우_에만 리턴. Requset로 던진 JSON 형식의 값을 분석 할 수 없거나 필들에 부적합(문자열 필드에 넘버 타입 사용)한 필드가 있는 경우 반환. 실패 이유는 반환값에 정확히 표기되어 있으므로 참조할 수 있다. |
| 401 | sender 계정의 인증에 문제가 있는 경우. 유효하지 않은 API Key 사용된 경우 나올 수 있다. |
| 5xx | 509~599 까지의 코드를 리턴하며, GCM Connection Server가 내부 오류로 인해 잠시 사용할 없는 경우에 리턴된다. 이 경우 retry-after 처리를 해야 한다. |
HTTP 상태 코드가 200인 경우 처리
JSON 요청이 성공적인 경우 HTTP 상태코드는 200으로 리턴이 되며, 이 경우 Downstream HTTP message response body가 JSON 오브젝트로 리턴이 된다.
모든 메세지의 ID 정보로 GCM diagnostics를 통해서 메세지 처리가 잘 안되는 경우 Trouble shooting할 수 있다.
Respone 처리 순서
GCM 에서 권고하는 resonse 처리 순서는 다음과 같다.
failure와canonical_ids값이 0인 경우 나머지 반환값에 대해서 분석할 필요가 없다.- 그 외의 경우에는 아래
results필드의 오브젝트를 리스트를 반복처리해서 다음과 같이 처리해야 한다.message_id가 설정되어 있으면registration_id필드를 체크해야 한다.registration_id필드가 설정되어 있다면 GCM에서 해당 값이 변경되었다는걸 의미하며, 내가 가지고 있는 데이터베이스나 기타 저장소에서registration_id를 변경해야한다.- 이 경우 원본
registration_id값을 같이 전달해주지 않으므로 인덱스 정보는 동일하므로 요청 시 전해준registration_ids필드를 참조하여 원본 값을 추출해야 한다.
- 나머지 경우는
error필드 처리다.Unavailable인 경우 또 다른 요청으로 재전송 처리해야 한다.NotRegistered인 경우 클라이언트 앱을 언인스톨했거나 클라이언트 앱이 요청을 받는 설정이 안되어 있는 경우이고, 서버가 가지고 있는registration_id값이 더 이상 유효하지 않으므로 삭제하거나, 변경처리를 해야한다.- 나머지 오류의 경우에는 회복이 불가능한 오류 이므로 서버쪽에서 resgistrationd을 삭제하라고 권고하고 있으며, 오류 처리는 Downstream message error response codes에 나와 있는 코드 별로 처리 하면 된다.
GCM response example
크게 주의 할건 registration_id가 변경된 경우 원본값을 함께 주지 않으니 index를 주의하여 내가 보낸 요청 값에서 원본을 잘 뽑아내 변경처리 해야 할 것 같다.
{ "multicast_id": 216,
  "success": 3,
  "failure": 3,
  "canonical_ids": 1,
  "results": [
    { "message_id": "1:0408" },
    { "error": "Unavailable" },
    { "error": "InvalidRegistration" },
    { "message_id": "1:1516" },
    { "message_id": "1:2342", "registration_id": "32" },
    { "error": "NotRegistered"}
  ]
}
정리
지금까지 rabbitmq를 설치/설정하고 client앱들을 php와 node.js로 만들고 최종적으로 Consumer client인 node.js 앱에서 node-gcm을 통해 push처리하는 과정을 진행했다.
여기에는 rabbitmq를 clustering으로 묶거나 ha 구성하는 작업은 빠져 있지만, 실제 작업엔 포함될 예정이고, 이 또한 관련 매뉴얼등을 보면 크게 어렵지 않게 구성될 것 같다.
오픈소스로 잘 구조화 되어 있는 amqp, gcm 모듈을 사용하여 수많은 삽질을 줄여주는건 좋지만 역시나 spec 정도는 꼼꼼히 한번 읽어보고, 이게 왜 이렇게 처리되는가 혹은 그 안에 소스들은 어떤식으로 동작하는가를 살펴보는 것도 앞으로의 코딩생활을 위해 중요한 습관이 될것 같다.
Reference
- https://www.cloudamqp.com/blog/2015-05-18-part1-rabbitmq-for-beginners-what-is-rabbitmq.html
- https://www.cloudamqp.com/blog/2015-05-19-part2-2-rabbitmq-for-beginners_example-and-sample-code-node-js.html
- https://www.cloudamqp.com/blog/2015-09-03-part4-rabbitmq-for-beginners-exchanges-routing-keys-bindings.html
- https://developers.google.com/cloud-messaging/http
- https://developers.google.com/cloud-messaging/http-server-ref
- https://github.com/ToothlessGear/node-gcm
- http://www.rabbitmq.com/getstarted.html


